First steps with PSGML and TEI |
|
Christian WitternChung-Hwa Institute of Buddhist Studies |
|
| December 2000 |
It is assumed that you successfully installed Emacs and PSGML to the computer you are using and fired up Emacs. On this tutorials CD-ROM, you will find all that is needed to do this. For further instruction, please see the file README.HTM in the root-directory of the CD-ROM
This tutorial will guide you through the first steps with this powerful tool. Sit back and relax, while we make a test drive. You might then want to try it yourself and create your first TEI conforming document.
Emacs is a very powerful tool by itself and PSGML adds the functionality of a full-blown SGML/XML editor to that, with a lot of sophisticated features. However, since Emacs is working in many respects different from most Windows applications (Emacs already existed for 15 years when Windows made its first appearance), you will at times find it difficult to work with it. The first few hours or even days could be demanding and even after that, you will occasionally feel desperate. The aim of this tutorial is to help you with the first steps, so that you can start using Emacs and discover more of its workings while doing productive work with it. I hope you will soon realize that the time and energy spend learning Emacs is one of the best investments you ever made.
OK, lets start. If you are sitting in front of your computer, bring the input focus to the window representing Emacs (this is usually done by clicking with the mouse somewhere in the window).
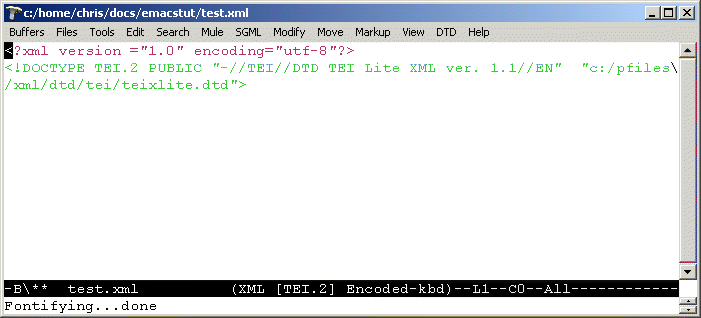
You should see a screen similar to the one in Figure 1.
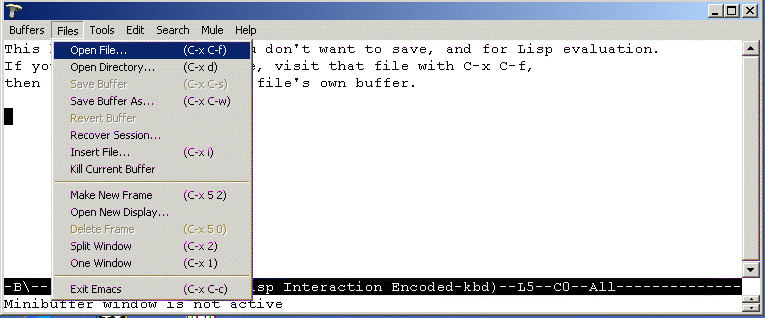
Now start your first file. In Emacs, opening a file is done with the find-file command. This opens an existing file or creates a new file, if a file with that name did not exist before. To find a file, you could select the command Open File... from the menu under Files on top of the screen. However, it is much faster to use the keyboard, since you are using it anyway most of the time for typing. If you click on the Files menu item on top of the window, you will see something similar to Figure 2.
The cryptic characters behind the words Open File... (C-x C-f) tell you about the keystrokes used to execute this command. The meaning is as follows:
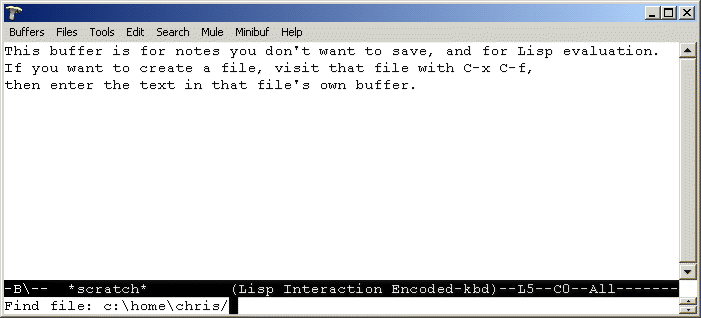
After this keystroke, the mini-buffer should have changed to something similar to Figure 3:
The command is called find-file and Emacs prompts you also with the words ‘Find file:’ . After these words Emacs has already inserted the beginning of a path which is the path to your home directory.
At this point, I would like to make another small detour to explain what a home directory is to Emacs. Emacs expects you to be a reasonably organized person, who puts her files into one well defined place, instead of scattering it all over the place as Windows itself is doing it. The place, where the files should be, at least as Emacs understands it, is the home directory. While this is sometimes defined by your system administrator, on Windows you might have the freedom to define you own home directory. If you do not define a home directory, Emacs will use the root of drive C (C:\) as the home directory. Since this is a bad idea, I told Emacs to consider the directory c:\pfiles\home as your home directory. In this tutorial, this is where we store the files. To keep things even more organized, I created a directory emacstut and we will use that directory.
Since Emacs is still waiting for you to find the file, we will now point it to the file. Type the two letters em. Your screen should now look somehow similar to Figure 4.
Now go ahead and press the tab key (this key has sometimes printed one or two arrows on it and is located in the upper left region of your keyboard, to the left of the letter Q). You will see that Emacs all of its own inserted the rest of the name of the directory and appended a slash / character to the end of it. This is a nice feature of Emacs which allows you to save a lot of typing. It is called `completion' and is available with a lot of commands.
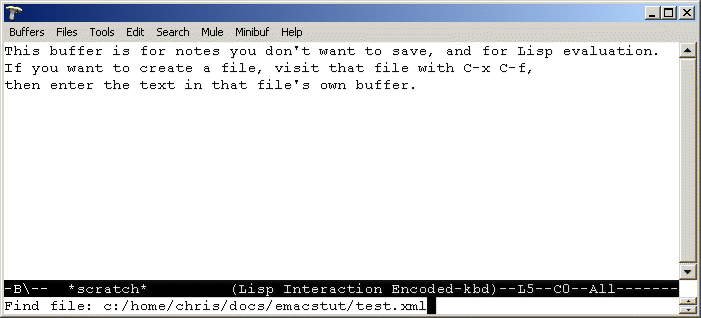
Now complete the filename and type test.xml as in Figure 5:
After completing the filename, press the enter or return key. For a moment you will see the message (New file) flashing in the mini-buffer, Emacs reminds you that this is a new file and you are not opening an existing file. This is useful, since most of the time, you will want to open an existing file. Figure 6 shows the brand new file sitting in an empty buffer (buffer is what in Emacs speak is called the area where you edit your text).
You now are ready to begin inserting markup into this blank new buffer that you just created.
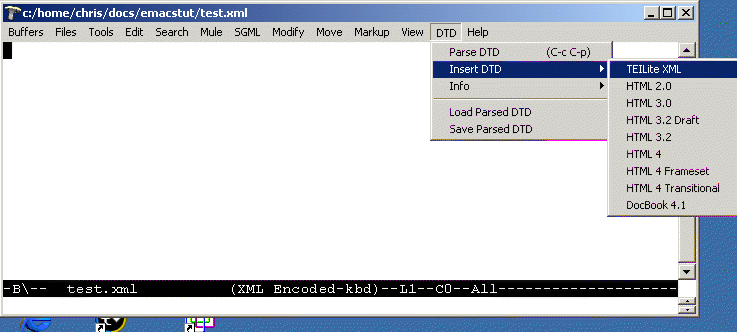
If you look carefully, you will see that a number of new items have been added to the menu bar: SGML, Modify, Markup, View and DTD. You might click on these items and look what lies under them, but most commands don't make sense in an empty file.
You might wonder, why Emacs inserted these menus. It has been configured to recognize the file extension xml (that is, the trailing letters after the last dot) as a xml file, which should be edited in xml mode. Xml mode, however, is just a variant of SGML mode (which is provided by PSGML, written by Lennart Staflin and James Clark), and for that reason one of the menus is called SGML. You can see which mode is the current active mode (along with a lot of other information) from the line with black background and white letters, which is located immediately above the mini-buffer. This line, by the way, is aptly called the `mode-line' because it indicates the mode.
If we want to use the TEI guidelines, we will have to use the TEI DTD and need some way to tell Emacs about the TEI. Here is how to do so:
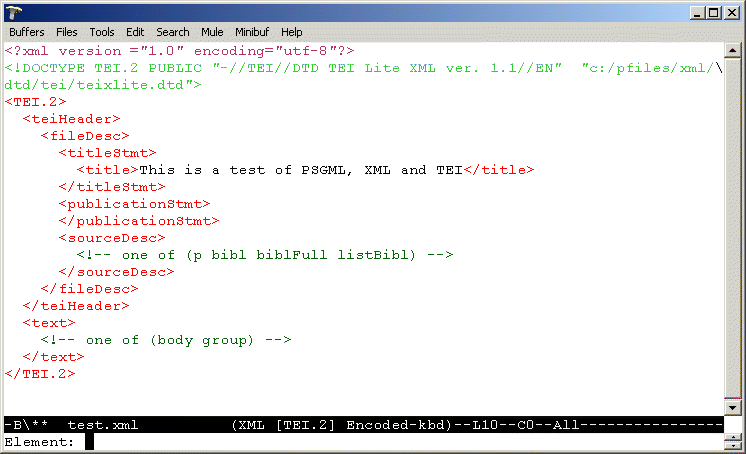
The first line is the XML declaration, which is required by every XML file. The second part defines the encoding of the document, which is to define, how characters are defined in this document. The encoding `utf-8', a variety of Unicode, is the default for XML documents, but it is a good habit to mention it explicitly. The Emacs on the CD-ROM is set up to support utf-8, but after opening a document you might have to press F3 to activate utf-8 for the current buffer. The first part of the modeline informs you about the encoding of the current buffer, which is -B in Figure 8, which stands for the `Big5' encoding frequently used in Taiwan. This would be -u in the case of utf-8.
The next line is the `DOCTYPE' line, which tells PSGML and other XML processors which type of document you are using. Since hopefully everything is set up correctly, we don't need to worry about the details here.
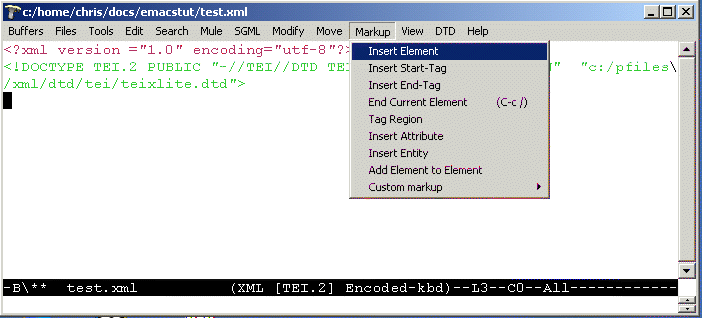
Now move the cursor down to the beginning of the third line as in Figure 9 and click on the Markup menu:
The item we want to use now is the first, Insert Element. After issuing this command by clicking on this item, the screen changes to look like Figure 10:
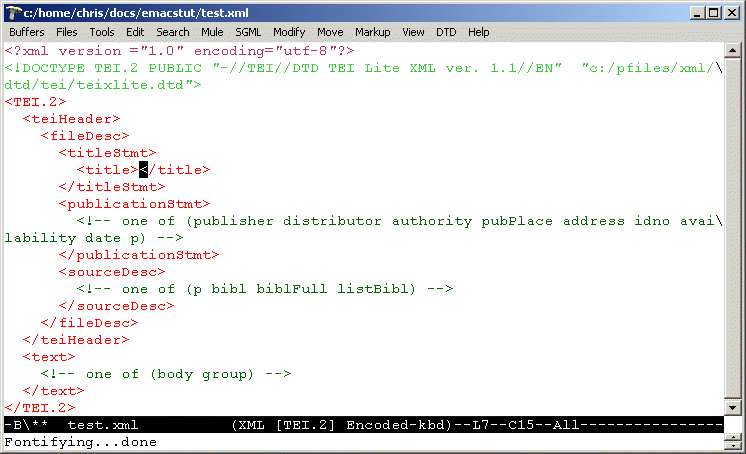
This command is used to insert markup into the file. Since PSGML has read the DTD, it knows what elements are permitted at which location of the file and allows only the insertion of permitted elements. In this case, there is only one element, <TEI.2> and we will insert it by clicking on it. Figure 11 shows how the screen looks after issuing this command:
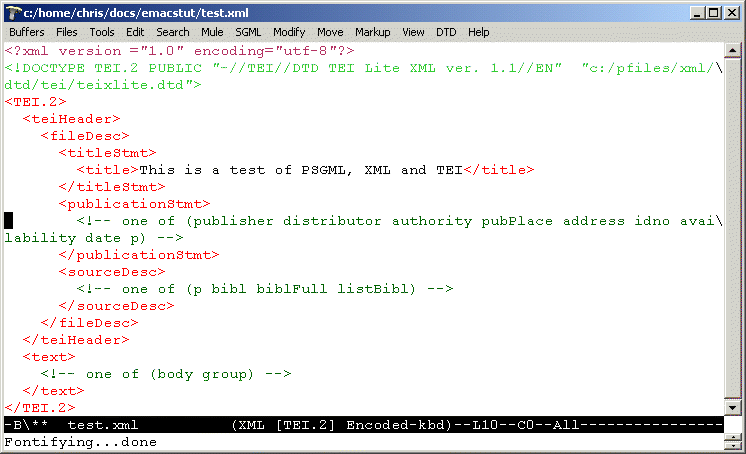
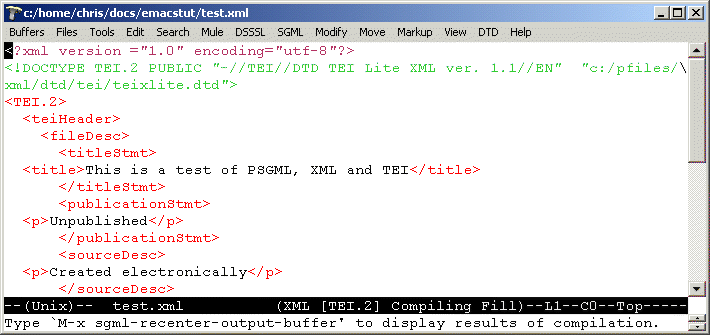
As you can see, PSGML inserted not only the TEI.2 element, but all nested elements that are required. This is a very handy feature, since you now already have a skeleton, which is a good starting point to edit the <teiHeader>. Of course, PSGML can't add content for you. It does help you even here, however, by locating the insertion point at the <title> element, which is the first to which you will add content. Please type here the title of the document, ‘This is a test of PSGML, XML and TEI’ , or whatever you like to call this document as shown in Figure 12:
You will notice that the TEI markup elements are in red, while ordinary text is in black. This is very useful to distinguish text and markup quickly.
You might wonder about the text that appears in darker green at some places between the markup. In the color scheme used here (which you can change to your hearts delight of course, but that is an advanced topic), darker green indicates SGML/XML comments. Comments are notes you might insert into the file to remind you about something, but they don't show up in the output when the document is prepared for electronic or paper publishing. PSGML uses these comments here to tell you about places where some markup is required, but there are different options. In the comment, you find a list of markup that is valid at this point, so you can scan this list and decide which you want to insert at this location. This is intended to quickly fill out the gaps in this skeleton. If you are done with it, you can get rid of the comments, since they might confuse you. The shortcut key for deleting a whole line in Emacs is C-k, pressing this two times gets rid of the whole line and the line-end character.
Let us now fill in the missing parts of the TeiHeader. Figure 13 shows the file with the first comment deleted.
We will now add a paragraph element here. Instead of using the menu, we will use the keyboard, since this is much faster. The keychord for inserting a new element is C-c C-e. Figure 14 shows the situation after this keychord has been pressed.
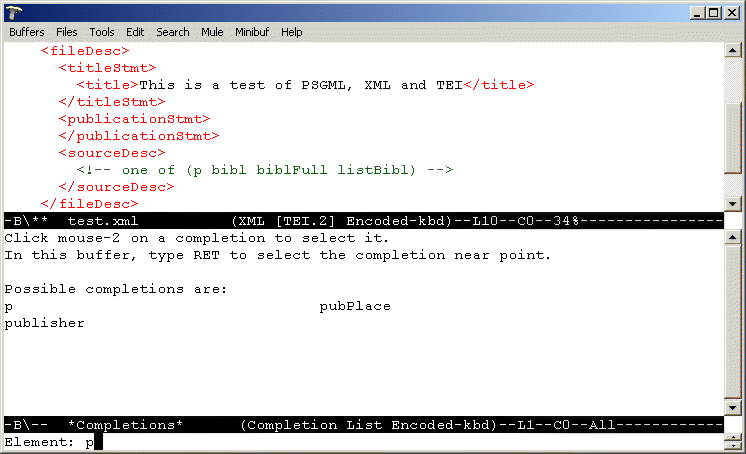
In the mini-buffer, you can see the prompt line, asking you for the element to insert. You can now start to type the element name. As in other situations in the mini-buffer, completion is available with the tab key. Type p and then press tab and you should see a situation similar to Figure 15:
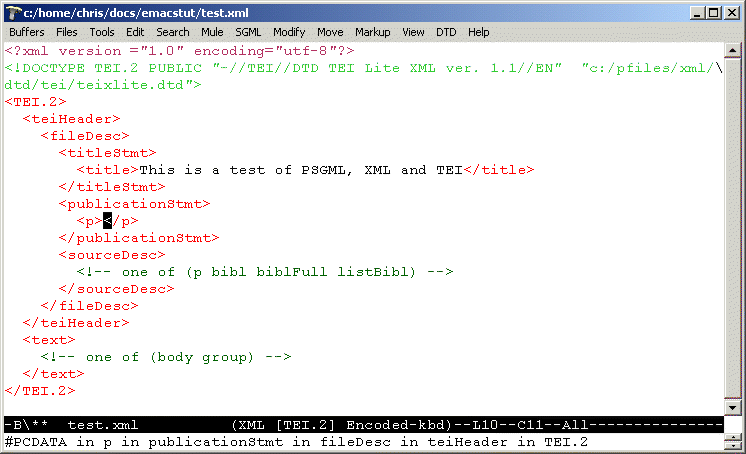
As you can see, elements beginning with 'p' are listed here. It should be noted that these are only elements valid at this point, for example <publicationStmt> is not valid here, so it is not listed. You can now continue to type, or press enter and <p> will be inserted into the file. The result is shown in Figure 16:
As can be seen, the mini-buffer now displays the relevant context model, as it is defined in the DTD and the context within the file. At this point, the context model allows #PCDATA, which is SGML/XML speak for normal text. Therefore, we are free to insert some text here, which has been done as is shown in Figure 17:
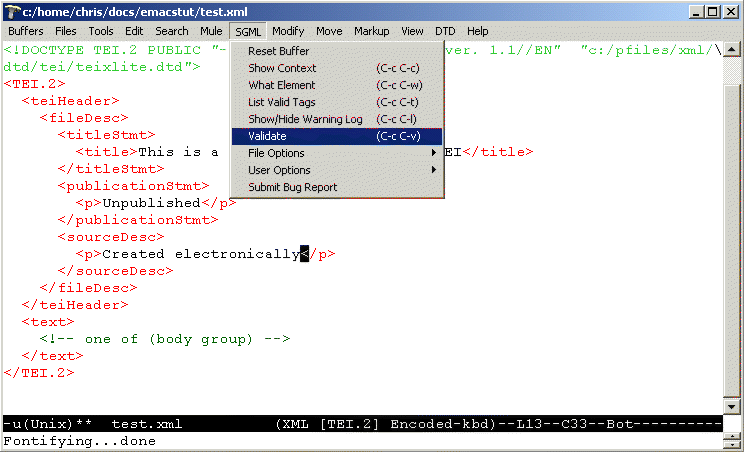
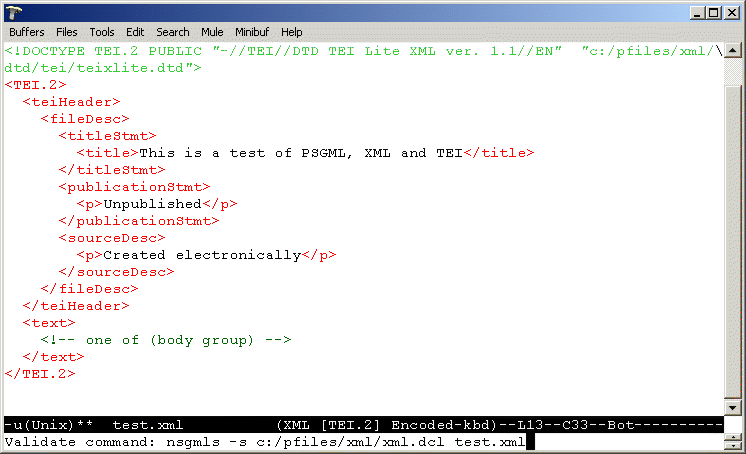
Having started entering text into the file, at some point we might wonder, whether the changed file is still valid in respect to the DTD. In SGML/XML this question is passed to a parser, which is a program that looks at the DTD and the file and reports whether the file confirms to the specification in the DTD. PSGML here is configured to use the parser NSGMLS (SP) by James Clark. In Figure 17, it can be seen, how the parser is invoked from the menu with the Validate command. You can also see the relevant keychord, which is C-c C-v.
Again, as shown in Figure 18, the mini-buffer acts as a prompt line. The command line to invoke the parser is already filled in and can usually be accepted without change. If necessary, however you can edit the command line before issuing it. After you hit enter, the parser will do its work.
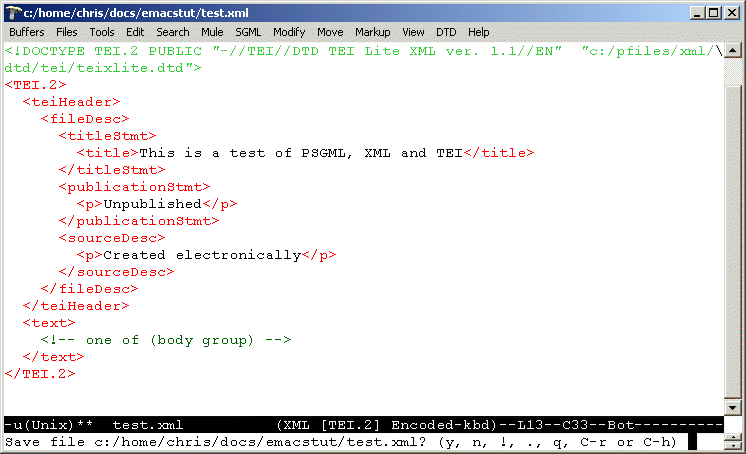
Emacs/PSGML however, as shown in Figure 19, if configured to do so, will first check, if the file has been saved. In this case we did not save the file, so we are prompted whether we want to save the file. Of course we do. If we don't save the file here, the parser will read an old version of the file and the report will not match the file in our buffer. For that reason, please do always save the file. Of course, even without being prompted like here, it is a good idea to frequently save the file, which Emacs does after you press C-x C-s.
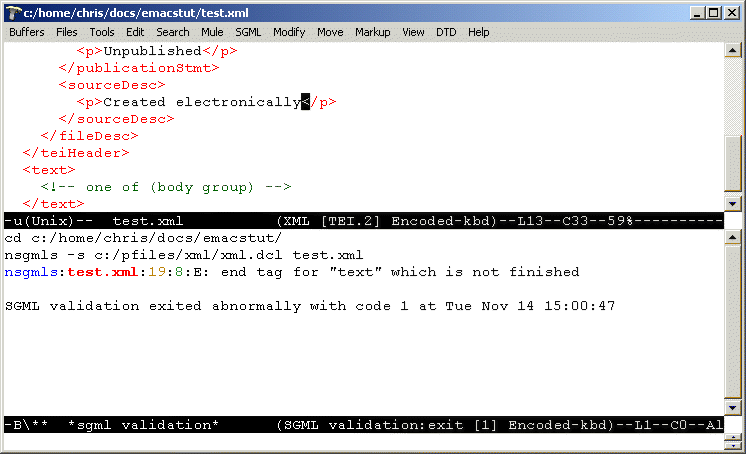
Figure 20 shows the situation after the parser finished its work. The line beginning with 'NSGMLS' in blue is an error the parser detected. It first reports the exact location, including filename, line number and number of character on that line. The capital E is a hint on the type of problem, in this case 'E' points to an error. Finally, NSGMLS provides us with a short description of the problem. In the situation shown here, the parser encountered the end-tag for <text>, before the content as described in the DTD was encountered, so it raises an error. This confirms what PSGML told us, namely there should be a <body> or <group> element, before the end of <text>. Because NSGMLS encountered an error, its return value indicates an error, which PSGMLS translates into a 'abnormal' termination of the program.
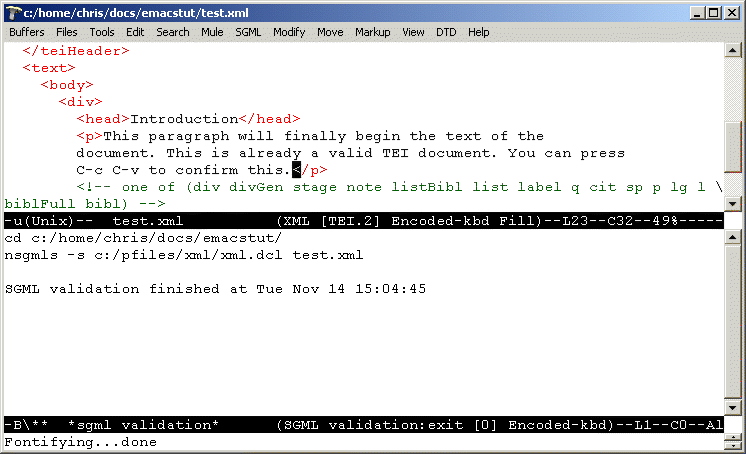
In Figure 21, the problem has been corrected and some text entered. A validation at this point detects no further problems, so PSGMLS only tells us that the SGML validation finished. We thus can be sure that the file is valid against the DTD and can further process the file in any way we might intend.
The best strategy for adding markup for existing files is to first create a skeleton with the header as we did in the previous chapter and then continue from there. If you find you need to produce similar skeletons often, you might even consider to save one as a template, although, as you just saw, creating a TEI compliant file from scratch is just a matter of a few keystrokes with Emacs and PSGML.
In this part, we will see how a few PSGML keyboard shortcuts come in handy when adding markup to an existing file.
One of the most convenient and powerful features of PSGML is its ability to split an element. This comes especially handy, if you have already a text file and want to add markup. You could for example add a skeleton as suggested above and then paste all the text of the existing text file into a <p> element in a <div> element in the body of the document. To separate the individual paragraphs and divisions of the document, you will then move the cursor to an appropriate location and then issue the C-c RET keychord. This will split the current element at the location of point. If you pay attention to the mini-buffer, you will notice a message ‘Repeat the command to split the containing div element’ . This means, if you issue the command again, it will split the containing <div> element and place the new <p> element in the newly created <div> element. Just try it out and see how it works!
After a while, you will gain more experience about which elements are valid at which place in the document. Especially when typing a document, you will then find it more and more convenient to directly insert elements in the document. There are two commands that allow you to insert start tags or end tags of an element separately. For start tags, use C-c <. This will prompt you in the minibuffer for the element and will only accept valid elements at that point in the document, completion is also available as usually. If you arrive at the point, where you want to close the element, just press C-c /, which will automatically insert the correct end-tag of the last open element. Please try it out!
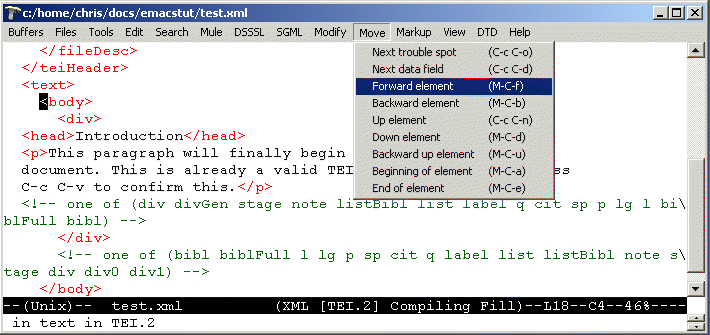
A number of convenient commands for moving through the document are to be found in the Move sub menu on the menu bar. All of these commands are available as keychords and provide a very fast and convenient way to move through the document.
Figure 22 shows the menu opened. Please play with these different keychords and try to understand the way they work. This will make your work with Emacs and PSGML much more efficient.
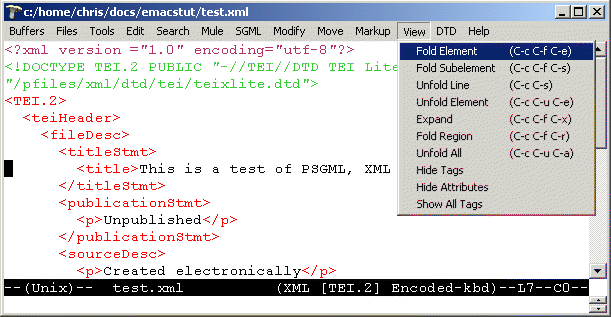
Another convenient feature of PSGML is that it allows you to hide and show parts of the document, based on its markup. This is especially handy when working with large documents, where you might want to look only at a part of the document. There are different commands, most of them available from the view menu in the menubar. Figure 23 shows what you can get at that menu:
You might want to use a larger document to try these commands and make yourself familiar how they work.
Emacs and PSGML are by far too complex and rich in functionality to be covered by a short tutorial of just a few hours. There are however a few tricks that are so important and handy, they need to be mentioned here.
Emacs is with some justification called the ‘self-documenting editor’ . It has not only an extensive help system on all of its internal functions, definitions and variables, which you can peruse down to the level of the programs source code if you wish so. There is also an online tutorial, which will guide you through your first hours with Emacs (although it seems a little dated now) and in most cases its just easier to start using it and use the help facilities here to look for more information. In the first months with Emacs, a good reference card of keychords is invaluable and should never be far from the keyboard.
All help facilities in Emacs are accessible from C-h. Here are some of the more important ones:
Emacs is extremely configurable, so one advantage of the online help facility to printed documentation is that it actually reflects the settings currently active in the system. If you for example redefined or added some keychords, they will appear with their new meaning in the online information!
Emacs has hundreds of commands, but not all of them can be invoked with keychords. How are they invoked then? Good question. There is one function, invoked with the keystrokes M-x (press the alt key and hold it down while pressing X) that will take a command and execute it for you.
For many commands, the input you gave is saved for future use. These commands are saved in a history list, which you can scroll through with the commands M-p (previous) and M-n (next). In the find-file command for example (invoked with C-x C-f, you will see the last file you opened, which makes it easy to open it again, or a file in the same directory. The same is also true , i.e. for the insert-markup command, even here you will find the elements you inserted before are available for reuse.
Occasionally, you issue a command and find that you did not intend to do so. An easy way out is C-g, the quit command.
The main advantage of using markup like the TEI encoding is its suitability for long-term archiving and publishing in a variety of formats.
While there is not time in this tutorial to go into the details of DSSSL (a stylesheet format for SGML documents), Jade (an Open Source DSSSL engine) and the various ways of transforming SGML/XML to PDF, anybody interested in this is encouraged to check out the detailed `Howto'-file by Martin Hoenicka at http://ourworld.compuserve.com/homepages/hoenicka_markus/ntsgml.html (a copy of this document has been placed on this tutorials CD-ROM).
A completely different approach is using XSL transformations to render XML files for publishing on the Web, as slideshows or in print. Sebastian Rahtz of Oxford University's Humanities Computing Unit, has developed a complex set of XSL stylesheets (available at http://users.ox.ac.uk/~rahtz/tei/), that can be used for this purpose. These stylesheets are highly modularized and parametrized. To help the baffled user getting started with this variety of options, Sebastian created a form-based web interface, that allows to interactively customize the stylesheets, in a way, this is a colleague of the Pizza Chef. You will find the form at http://quirk.oucs.ox.ac.uk/cgi-bin/tei/stylebear. A stylesheet named ‘mytei.xsl’ is generated with this form. This stylesheet is used to invoke the other stylesheet machinery. You can place it anywhere you want to have it, a copy has been placed in your home-directory for this tutorial.
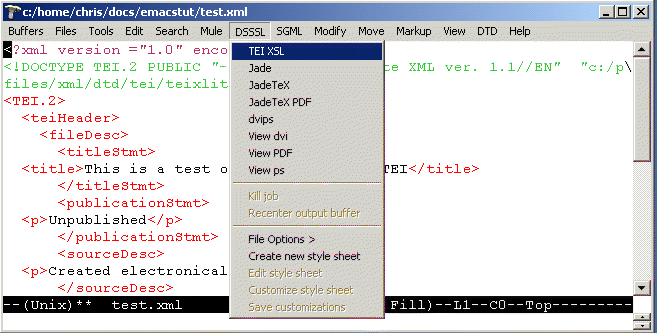
To make the invocation of the XSL transformation even more convenient, I added an entry to the DSSSL menu called `TEI XSL'. You can select this entry on a XML TEILite document and use this to produce a HTML version of the document suitable for publication on the web.
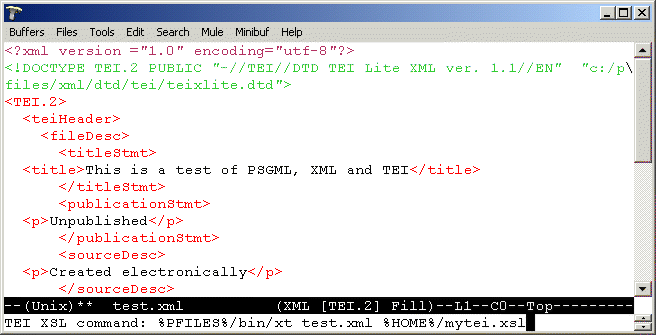
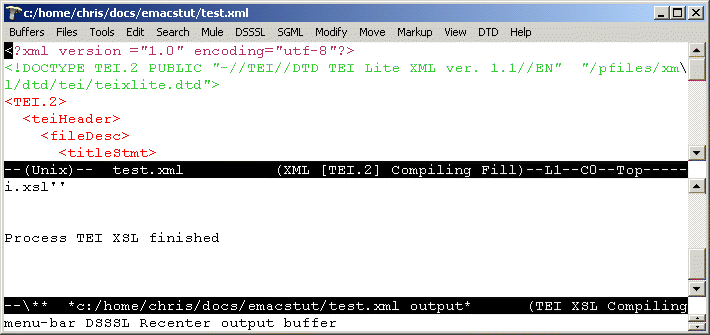
Figure 24 shows the TEI XSL menu selected. Invoking the command will produce a command line to call the XSLT processor XT with some convenient arguments. It is here assumed that the customized XSLT file is in your home directory and is called ‘MYTEI.XSL’ .
Pressing enter in the situation in Figure 25 will actually call the program, but Emacs does not wait for it to finish. Instead, it displays a message in the minibuffer, as shown in Figure 26:
The command M-x sgml-recenter-output-buffer is also available from the menubar, which might be more convenient. The output of the call to XT is shown in the buffer, that is brought to the front by selecting Recenter output buffer from the DSSSL menu. The result of this command is shown in Figure 27:
As soon as you see the message ‘Process TEI XSL finished’ , you know that XT has done it's work. Your document has now been transformed to HTML for browsing. You will find it in the file INDEX.HTML, located in the same directory as the XML file you are editing. Give it a try!
Sebastian has also versions that can be used for publishing the files as slides for a oral presentation or as PDF files for printed distributions.
There are not too many books available for Emacs, unfortunately. On a positive note, one reason for this might be, that the online manual included with Emacs and available with C-h i is an excellent introduction and there is not much more necessary.
But sometimes it is still nice to follow some advice on paper while looking at the computer screen. A number of general Linux introductions continue a chapter on Emacs, so you might look for one of those, especially if you plan to use Linux as well.
O'Reilly & Associates has a book Learning GNU Emacs by Debra Cameron and Bill Rosenblatt, which is currently in its second edition. The book is outdated and often not accurate, don't buy it. You might however be interested in the little pocket reference booklet, which makes a good companion for Emacs adventures.
Another book is Teach yourself Emacs in 24 hours by Jesper Pedersen et.al, published by SAMS. Although apparently put together in a hurry and containing many typos, this book is well worth its money and the time reading it. The web site for this book, somehow difficult to find (it is here), contains some corrections and source code missing from the CD-ROM that comes with the book.
The main development site for PSGML is now at Sourceforge (http://sourceforge.net/projects/psgml). There is also a mailing list for PSGML users. You might want to subscribe to this mailing list and post any questions you have with regard to using PSGML there.
There is also a generic Website for NT Emacs, with a very extensive FAQ, you can find it at http://www.tardis.ed.ac.uk/~skx/faq/faq.html. The FAQ contains a pointer to a mailing list for NT Emacs users, where you might want to post general question regarding NT Emacs. Of course you could also always go to the Usenet at comp.emacs to get help with Emacs.
The book SGML CD, A Complete SGML Toolkit (Prentice Hall, 1997, ISBN: 0-13-475740-8), by Bob DuCharme, out of print for some while, contained an excellent chapter on using PSGML and Emacs. This chapter is now available on the Web at http://www.snee.com/bob/sgmlfree/. This is definitely worth downloading!
If you are running into trouble with your setup or want to install a complete publishing system built on SGML/XML freeware, you should look at Martin Hoenicka's site mentioned above, which guides you through the whole setup process.
A good general place to look for information about SGML/XML are the XML Cover Pages at http://www.oasis-open.org/cover, which has news and up to date information conveniently arranged into categories. Of special interest is his software page, which lists a number of good SGML/XML tools.